
The rook and king checkmate is one of the easiest to learn, and it's one of the most powerful and effective way of winning the game. There are a lot of books and videos that explain how to do this, and there's one digital book that's available on our website that explains this really well – The Chess Fundamentals by J.R Capablanca.
So, how to checkmate with rook and king in endgames? The rook must be positioned to control the rank in front of the king’s path. The king should be moved to a square that is on the opposite side of the rook from the opponent's king. From there, the rook should be moved to a square that is adjacent to the enemy king and it should attack the opponent's king from the side or from behind.
The opponent's king must be prevented from escaping and you should position the king so that it can support the rook in attacking the opponent's king. Once the enemy king is trapped, then you can move your rook to checkmate the enemy king.
Now that you have an idea of how the rook and king can checkmate a lone king, next will learn the steps and look at an example of how it all works.
Table of Contents
How to checkmate with Rook and King?
Even though checkmating with a rook and king against a lone king may appear simple, there are numerous minor technical aspects that can make it easier. I'll go over a number of tactics and strategies in this section to help you achieve a successful checkmate in this endgame.
Let's begin by taking a look at the steps necessary to successfully checkmate your opponent with a rook and king versus a single king.
1. Move the rook first
2. Drive the opponent’s king to the last line
3. Follow up with your King
4. Keep your king on the same rank or file as opponent's king
Recommended Reading: If you want to learn more about chess strategies, read this article.
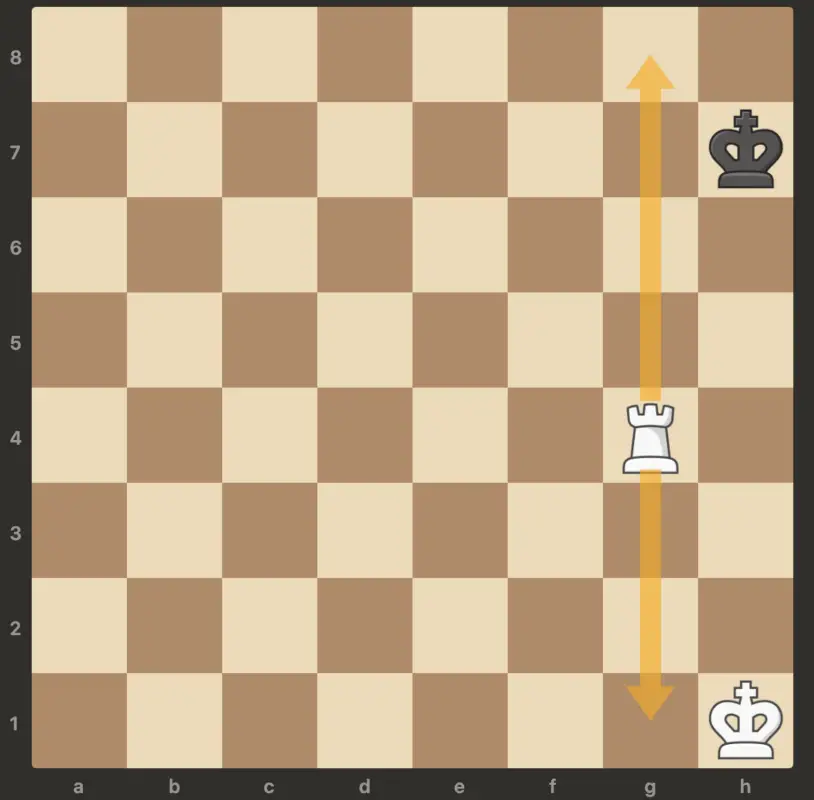
Step 1. Move the rook first
When you move the rook first it allows you to create limits to your opponent's movement immediately during the endgame. It also helps you establish control over the middle of the board as your rook move to occupy key squares.
See the image below:

Moving the rook first also gives you more options on how to attack your opponent's king, and you can use it to block off your opponent’s king from advancing.
In short, starting with the rook gives you more control over the game and more options for strategic moves during this rook and king vs lone king.
Step 2. Drive the opponent's king to the last line
The second step is to drive your opponent's king to the last line on any side of the board. Using your rook, you need to maneuver your opponent's king to any edge of the chess board so that you can checkmate your opponent.
See the image below:
This can be done by carefully covering the squares that your opponent's king can move – if you think your opponent knows what your plan is and it's difficult to drive your opponent's king to the last line…
This is where step 3 comes in…
Step 3. Follow up with your King
After you move your rook, your King should follow up to make the checkmate possible. This will ensure that your rook can continue to trap the opponent's King.
See the image below:
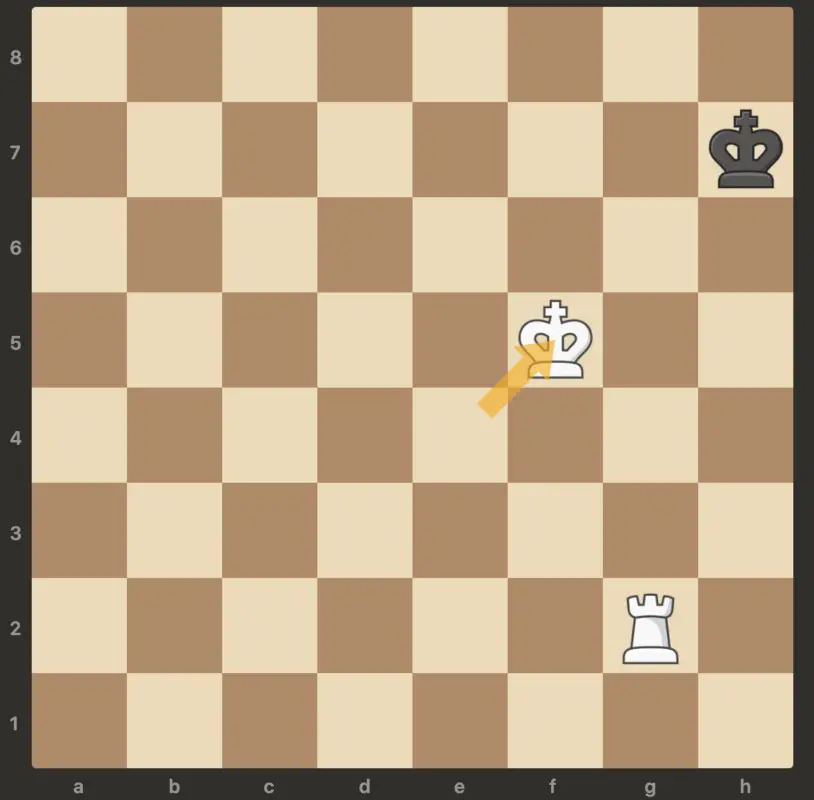
It is up to your king to cover the squares that your opponent is attempting to move if you are unable to drive or push your opponent's king all the way to the last line on any side of the board. This will help to strengthen your position and make it harder for your opponent to escape.
Your rook will have an easier time achieving the checkmate if you follow up with your king. Another question you may have is where to position your king to finally checkmate your opponent's king…
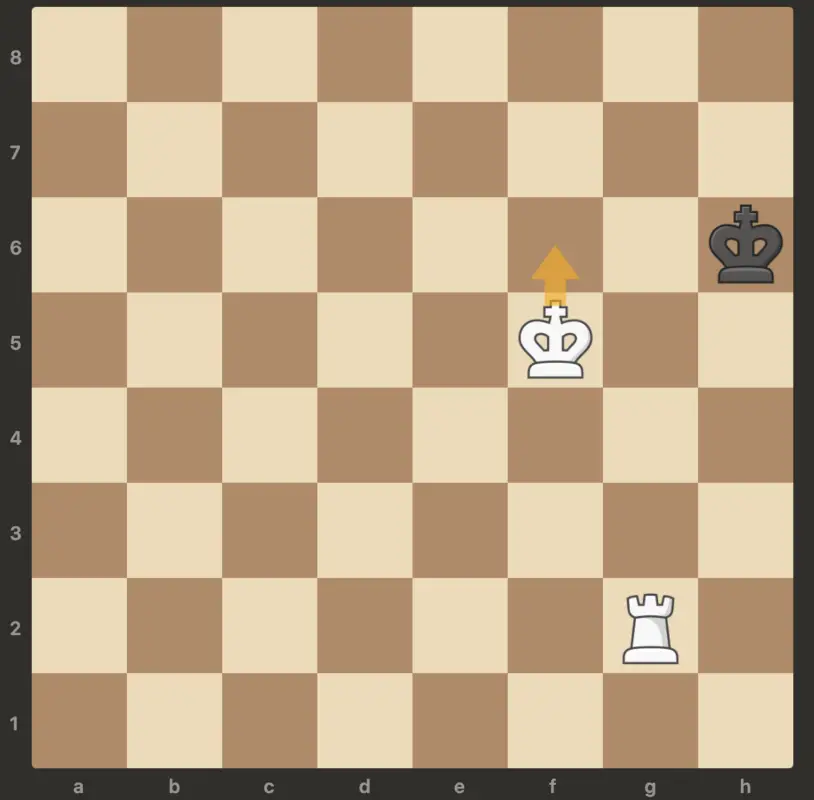
Step 4. Keep your king on the same rank or file as opponent’s king
Once you have driven your opponent's king to the edge of the board, the fourth step is to keep your king on the same rank or file with your opponent's king as you checkmate with the rook.
This ensures that your opponent's king cannot escape checkmate and that your king is there to cover the available squares of your opponent's king.
See the image below:
This is a crucial step in checkmating with a rook and king. Now that you know the steps in checkmating with rook and king.
Let's see some example to better understand how this all works.
Also you may want to read some samples of checkmate puzzles here.
Example of checkmate with rook and king against king
We will use J.R. Capablanca's explanation of rook and king against king in his book Chess Fundamentals as an example in this section.
One of the rules for checkmating a lone king in chess is to push it to the last line on any side of the board. The rook is one of the most powerful pieces on the board since it can cover a lot of squares.
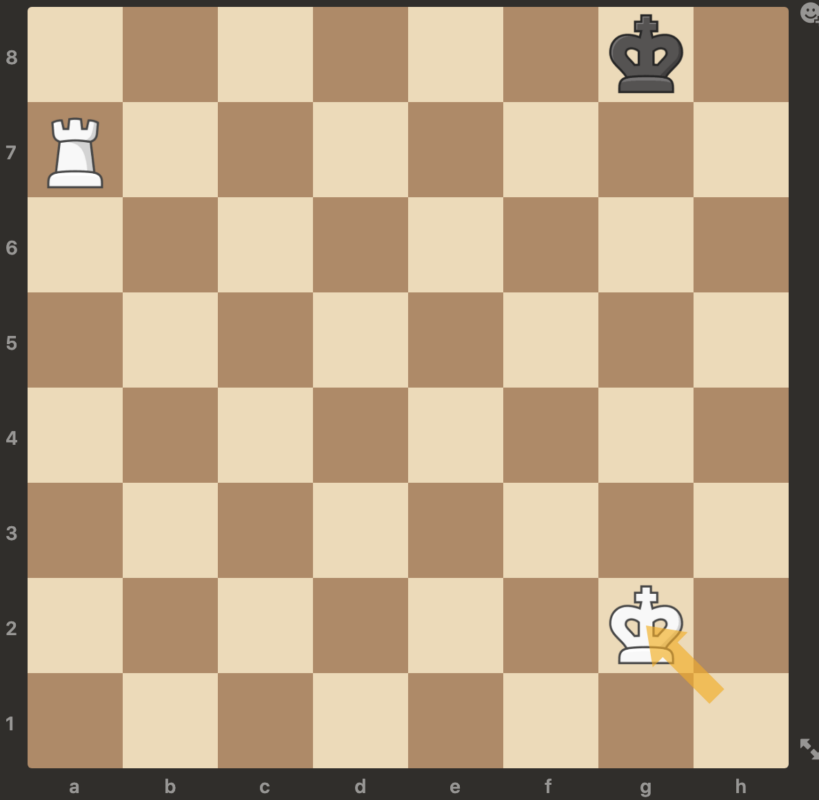
Let’s take a look at the example below and white to move:
So, the first step is to move the rook first and limit the squares your opponent’s king can move into.
And the best move is rook to a7…
See the image below.

Capablanca mentioned that the rook to a7 move demonstrates the power of the rook since it was able to confine the king in the last line or rank and it makes it a lot easier to finish the game.
Now that you have successfully confined your opponent’s king in the last line, or in this case last rank, which is step 2…it’s time to follow up with your king which is step 3.
Here are the next moves.
After white moves rook to a7, black king moves to g8, and white's next move is to follow up with the king.
See the image below.
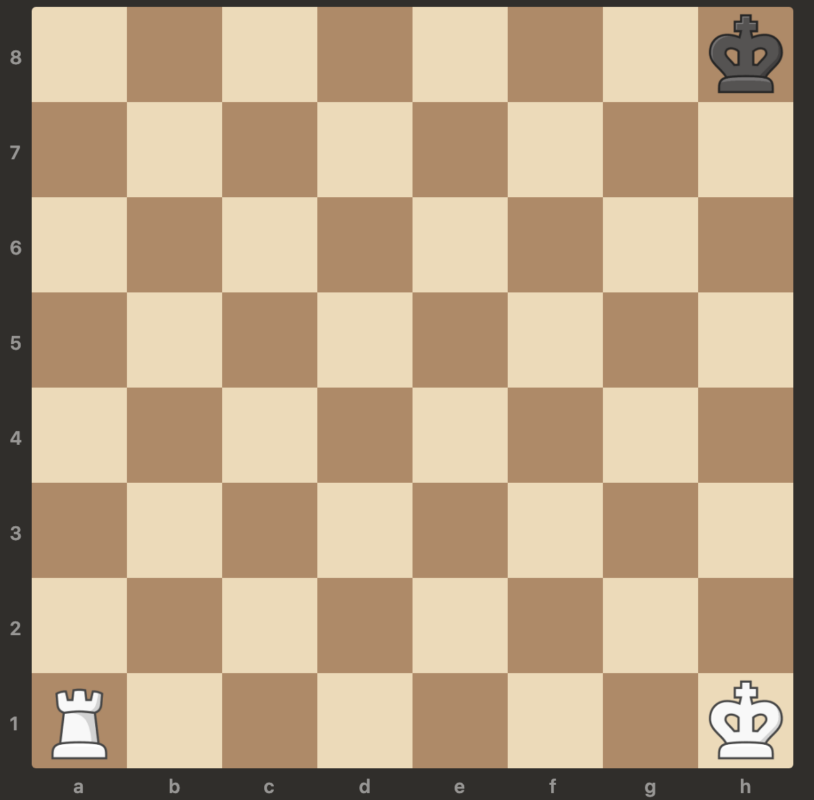
Here white moves its king to g2, and it follows step 4 above, which says you have to keep your king on the same rank or file as your opponent's king. And in this case white keeps the king on the same file as the black's king.
A combination of rook and king is needed to arrive at a position where checkmate is forced.
So, let's take a look at a position where the white king has reached the 6th rank.
See image below.
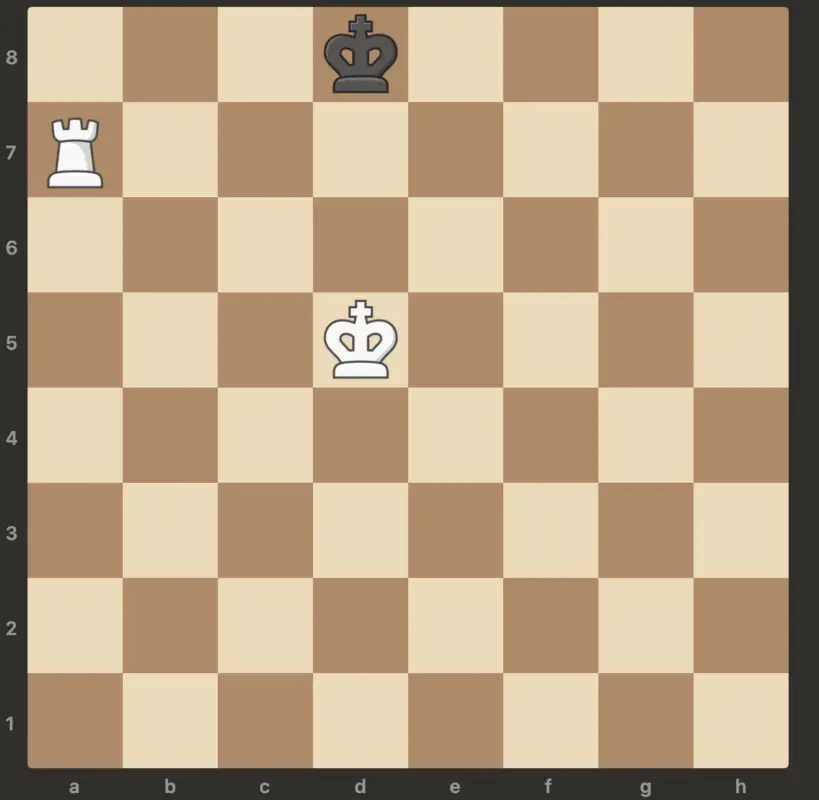
When you have reached the position above, the world chess champion advise that it is better to place the white king, not on the same file but on the one next to it towards the centre.
Let's see the complete move below:
2. …Kf8
3. Kf3 Ke8
4. Ke4 Kd8
5. Kd5 Kc8
6. Kd6 …
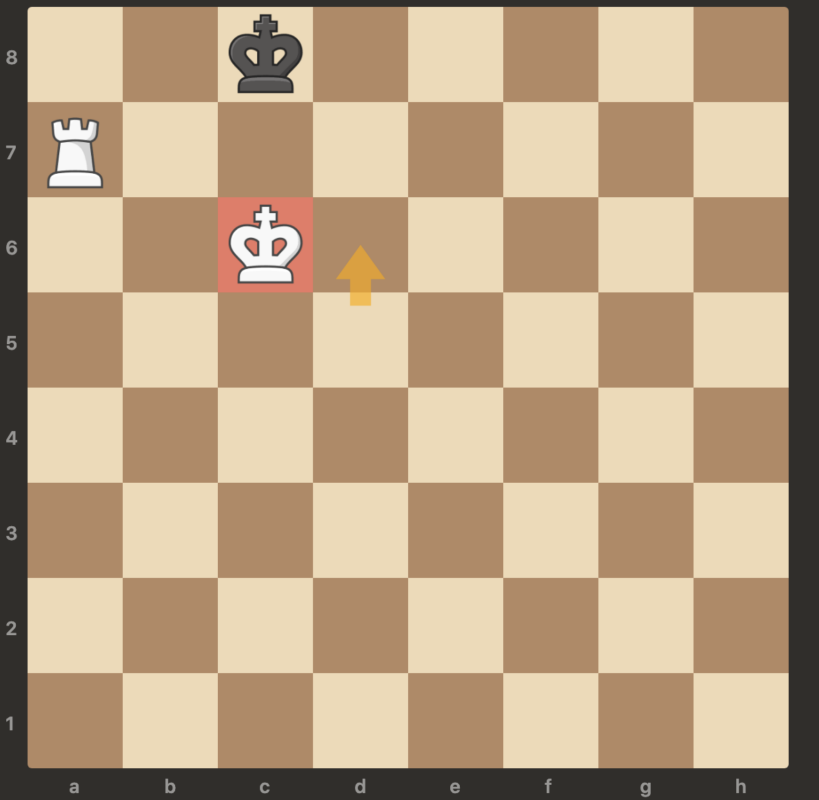
The move is not King to c6, because the Black King will go back to Kd8 and it will take much longer to mate. But if now the black King moves back to d8, Rook a8 mates at once.
Here are the next moves that leads to checkmate:
6… Kb8 7. Rc7 Ka8 8. Kc6 Kb8 9. Kb6 Ka8 10. Rc8#
If you noticed it has taken only 10 moves to mate from the original position.
Wrapping Up
Using the steps and tactics above will help you finish the game a lot easier and without confusion using rook and king against a lone king.
There are other scenarios with regards to checkmating a lone king which is positioned in the middle of the board instead of the last rank.
If you enjoy this online chess guide lesson from the master – I would appreciate it if you can share it with your friends or relatives that are also interested in learning chess.